
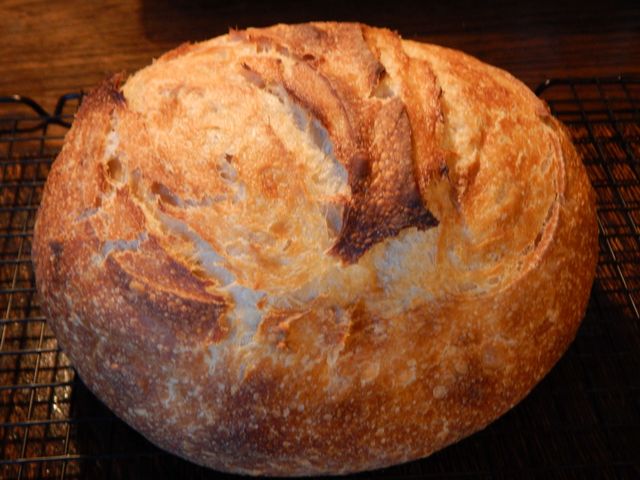
Sourdough Month wouldn’t be complete without talking bread. Here I share my favorite recipe. We call it Sourdough Cabin Bread because it makes my little Montana log cabin smell so good, but my young nephew has dubbed it “Auntie Julie’s Special Bread.” And it is special—whether you’re a new or experienced bread maker, you’ll likely be surprised by how easy it is to make these loaves. The techniques and tricks have two purposes: reduce effort and build flavor.
There’s a reason behind every technique given here. Using weights, instead of cups, improves accuracy. Mixing by hand, instead of with an electric mixer, prevents overmixing. Folding, rather than kneading, reduces your effort while enhancing the bread’s texture. A long fermentation allows the dough to feed, release gas, and develop flavor. The bowl in the oven captures steam and creates a crisp crust. The results are delicious, beautiful loaves that slice smoothly for sandwiches and other uses.
Sourdough Cabin Bread (double batch)
560 grams water
500 grams all-purpose flour
340 grams whole-wheat flour
10 grams (~1 scant tablespoon) salt
olive oil
Set a large bowl on a kitchen scale and add the starter. Measure in the water and stir briefly. Mix in the flour until the dough is combined and sticky. Cover with a damp towel; let rest for 30 minutes. Feed your starter.
Uncover the bowl, sprinkle salt over the dough, and then shift it onto a floured surface. Knead about 30 times. Oil the bowl lightly, return the dough to it, and re-cover to rest for the first of 3 hours.
Over these 3 hours, double letter fold hourly, totaling 3 times: Return the dough to the floured surface and gently stretch it in four directions as far as it can go without tearing, forming a large rectangle. Fold 1/3 over and then the other 1/3 over, like folding a piece of paper for a letter. Rotate 90 degrees and repeat. Return the dough to the bowl after each folding.
After fold 3, let the dough rest on the floured surface for 30 minutes. Do one last double letter fold; let the dough rest another 10–15 minutes. Divide the dough in half using a bread knife. Lightly shape one half. Place it in the oiled bowl and cover with the damp tea towel. For the best shape and texture, let it chill at least 1 hour 45 minutes; loaf 1 can even sit overnight. Place loaf 2 in a lidded container at least twice its size, leaving the lid open slightly. Refrigerate until a later baking day.
When ready to bake a loaf, preheat the oven and baking stone to 465°F. When the oven’s ready, remove the dough from the fridge, reshape the loaf, and score it twice with a sharp, floured bread knife, making quick slashes at an angle. Gently place the cold loaf on the hot baking stone and cover it immediately with a large stainless steel bowl. Bake for 30 minutes, remove the bowl, and then bake an additional 10 minutes. Cool the loaf completely before cutting for grilled cheese (see below) or other uses; while warm, the loaf is still cooking inside. Makes 2 loaves.
Tips & Tricks
- Like the soup and salad dressing recipes on this blog, this recipe is based on a ratio: 1 part starter, diluted with 2 times its weight in water, and turned into dough with 3 times its weight in flour. This means you can scale it up or down as you like.
- The chlorine, chloramines, and fluoride in municipal water can sometimes cause problems when working with sourdough. If you’re getting poor results, try using distilled water instead.
- I like a mix of all-purpose and whole-wheat flours in my loaves, but you can certainly sub in other flours.
- The repeated fold-and-wait process means you don’t have to spend long minutes kneading the heavy dough. If you’re not folding exactly on the hour, don’t worry; the dough can handle delays.
- If you don’t have a baking stone, just use a cookie sheet—but don’t preheat it. Do use a bowl larger than the fully expanded loaf; the steam lightens the interior and crisps the crust.
- Loaf 2 will have a stronger sourdough flavor but slightly denser texture than loaf 1. Loaf 2 will also continue to expand slowly in the fridge. It’s best baked within 4 days but can then be frozen if you haven’t finished eating the first loaf.
Twice as Tasty
 One of my favorite uses for sourdough bread is grilled cheese. Although this basic sandwich is surely already part of your kitchen repertoire, I have a few tricks and tips that will make your lunch gorgeous.
Of course, it starts with your beautiful, tangy sourdough loaf. You can always keep it basic, with a simple layer of cheese between two slices of bread. But if you’re on a mission to make your meals Twice as Tasty, you’ll want to add other flavors to the mix. My refrigerator—and yours—can hold various savory jams and spreads, mustards, pickles, and vegetables any time of year that pair well with bread and cheese. My basic recipe uses two of my favorites: whole-grain mustard and roasted garlic. Come back next month, and I’ll tell you how to make your own from scratch.
Gorgeous Grilled Cheese
1 teaspoon Spicy German-Style Mustard
2 cloves Roasted Garlic
4–8 slices sharp Cheddar cheese
1/2 tablespoon butter, softened
pickles for serving
Use a butter knife to spread mustard on one slice of bread; squeeze the garlic cloves onto the other slice and spread. Slice the cheese thinly, laying the slices in a single or double layer, as desired, on one slice of bread. Place the other slice over the top of the cheese, treated side down.
Preheat a cast-iron or other skillet over medium-low heat. Spread half of the room-temperature butter over the top of the sandwich. Place the sandwich, butter side down, in the hot skillet. Spread the remaining butter over what is now the top of the sandwich. Cook 3–5 minutes, until the underside is golden brown, and then flip the sandwich and cook the other side another 3–5 minutes. Serve immediately with pickled snap beans or Better Bread-and-Butter Pickles. Makes 1 sandwich.
Tips & Tricks
- I prefer ultrathin slices of cheese in my sandwiches. Instead of a knife, I recommend an ostehøvel, a Norwegian-style cheese slicer easily found online and in local stores. Using its thin slices lets you control the greasiness of your sandwich.
- A strongly flavored cheese also gives you plenty of zing with less fat in your sandwich. Sharp Cheddar is my favorite, particularly if we’ve smoked it, but any cheese that slices well and melts somewhat when heated works here.
- Roasted garlic and mustard are just two of many flavors that work well with grilled cheese. Other spreads, such as Grilled Onion Dip or savory tomato–basil jam, are also delicious. Pickles, whether cucumber or green tomato, can be stuffed right into the sandwich, as can carrots, grated into thin, wide strips using a vegetable peeler, and bell pepper, sliced into ultrathin rings using a mandoline.
- Although it wouldn’t be considered “grilled cheese” by purists, a lower-fat, lower-carb sandwich can be created by melting cheese over open-faced sandwiches in a toaster oven. Using just one slice of bread per sandwich and no butter, simply layer on the spread, two thin slices of cheese for grip power, vegetables, and then a final layer of cheese; run it all through the small oven on the toast setting. Just before serving, top with fresh sprouts.

We’re snowed in, perfect time to bake the first loaf from the starter.
LikeLike
Indeed! I’m doing the same thing, baking test versions of new sourdough recipes to share next month. So far it’s working out beautifully: I made up the dough, skied down to the river, and got back right on time to fold it!
LikeLike
Just made our first ever sourdough loaf on Saturday and it was tasty but not perfect so will definitely try this one next!
LikeLike
Sorry to hear the first one wasn’t a winner, but hopefully you have more success with this version–everyone who’s shared their results with me has been thrilled. Do let us all know how it turns out!
LikeLike
I can’t wait to try this special bread.
LikeLike