

When I started this blog 6 years ago, one of the first recipes I shared was Basil Pesto Base, which I make in large batches in my food processor every time our basil plants threaten to flower and then freeze to use all winter. But recently, I had the chance to test mortars and pestles for The Spruce Eats and became hooked on the creamy texture of freshly pounded basil pesto. My reviews haven’t gone live yet on that website, but I couldn’t resist sharing the recipe and technique I developed during testing in my Twice as Tasty column for the Flathead Beacon.
Once I had several batches of freshly pounded pesto, I also couldn’t resist trying my hand at scratch-made pasta. With some tips and tricks—and a hand-cranked, countertop pasta maker—homemade pasta turned out to be far less messy and far less difficult than I had anticipated, with tasty results that paired perfectly with creamy, mortar-pounded pesto.
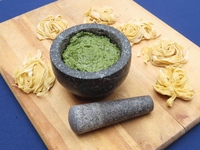
Learn more about pesto and get the complete recipe for Garden-Fresh Basil Pesto in my column.
 Make it, share it.
Tag @twiceastastyblog and #twiceastastyblog

Twice as Tasty
 Even though a friend had given me her hand-cranked pasta machine ages ago, I’d stuck it away as a rainy-day project and ignored it. In my house, store-bought dried pasta forms the base for many a quick dinner with an easy or premade sauce from frozen cherry tomatoes, larger grilled and canned tomatoes, or grilled bell peppers. Plus my little house and tiny kitchen didn’t seem to have the counterspace for a messy pasta project or rack space for hanging and drying pasta.
But once I had numerous batches of creamy, hand-pounded pesto to eat, it seemed a shame to pour them over cheap dried noodles. I started looking into what is really involved with making pasta by hand and discovered a few tricks that sent me to dig out that pasta maker:
- Fresh pasta needs few ingredients, none of them fancy. This dough simply consists of all-purpose flour, eggs, and salt. Some recipes use a blend of whole eggs and yolks, but my farm-fresh eggs have enough whites to keep the pasta moist and silky. They do tend to come out of the chickens in surprisingly varying sizes, so I weigh the flour and eggs for a consistent blend. You can easily use the cups and counts I give instead.
- Fresh pasta can be made in small batches. Even on my 2 square feet of counter, I can mix up a 4-serving batch of dough without needing to deep-clean the whole house, and even a double batch didn’t make an excessive mess.
- A pasta roller works quickly and with little effort. Turning a ball of dough into a flat pasta sheet was far faster and easier than I had expected with a little hand-cranked machine clamped to the counter. It was hugely helpful to have two people when rolling the dough, one feeding and one cranking.
- Fresh pasta can be cooked immediately or even frozen. I didn’t need to find space to dry pasta; I could just throw it straight into the pot, stick it in the fridge for a couple of days, or freeze it curled up in little nests that could be dropped fully frozen into boiling water.
Once we started cranking out pasta, it was easy for me to mix the dough, let it rest while we made a fresh batch of pesto, run the dough through the machine while the pasta water came to a boil, and cook and eat it our creation immediately.
The instructions I give here were developed from my experience with hand-kneaded dough and a hand-cranked pasta maker. I prefer hand kneading to using a machine because I can feel when the dough is ready and am less likely to overwork it. If you don’t have the hand strength to knead for several minutes, mix the ingredients in a food processor or stand mixer until they just start to comes together and then give the ball a quick knead to smooth it out.
The hand-me-down hand-cranked roller took surprisingly little effort to use, but an attachment for a stand mixer may be just as affordable if you have already dedicated space for that tool in your kitchen. You use them in the same way, starting with the widest setting and getting narrower with additional passes of the dough.
The detailed instructions that follow take you step by step through the rolling and cutting process for the pasta dough. If you already know how your machine works, you may still want to read the full recipe for tips on laminating (repeated folding). If you’re a visual person, the crew at Serious Eats has some fabulous step-by-step photos and an in-depth look at the science behind fresh pastas. Start at the top of the article if you want to get geeky about ingredients, scroll down to Step 1 for the dough mixing process, and jump farther to the photo of a red KitchenAid for dough rolling and cutting images.
Ready to give it a try? Full details are in the recipe below, but here are the basics:
You need just 3 ingredients.
1. Mix and knead the dough, and let rest.
2. Roll the dough in quarters through the pasta maker.
3. Cut the dough sheets into noodles.
4. Cook and enjoy.
Make it, share it. Tag your photos: @twiceastastyblog and #twiceastastyblog
Homemade Pasta
3 large eggs (180 grams)
1 teaspoon flaky kosher salt, plus more for cooking
Mound the flour on large work surface. In a small bowl, beat the eggs and then stir in the salt. Make a wide well in the center of the flour, pour in the eggs, and then use a fork or fingers to gradually mix the flour into the eggs, forming a sticky dough. Use a bench scraper or your hands to gather and fold the remaining flour into the dough, forming a rough ball. Knead the dough for about 7 minutes, dusting your hands with flour if it gets too sticky, until the ball becomes smooth and springs back when poked with a finger. Wrap in parchment paper and let rest at room temperature for at least 30 minutes.
Liberally coat a large jellyroll pan with flour. Unwrap the dough ball and cut it into quarters with the bench scraper. On flour-dusted work surface, work one quarter into a rough egg shape; rewrap the remaining dough. With a rolling pin, flatten the dough ball into an oblong about 1/2 inch thick.
Set the flat pasta roller (as discussed earlier) to its widest setting and roll the dough through 3 times. Laminate the dough by folding the shortest ends in to meet at the center and then folding the dough in half, like closing a book. Roll the rolling pin across the dough’s narrowest width to widen and flatten it. Feed the widest edge of the dough into the roller and crank through at the widest setting, and then narrow the setting by 1 and roll it through 3 times. Repeat the lamination and flattening, pass once through the roller at the next-widest setting, and then narrow the setting again and roll through 3 times. After a third lamination and flattening, roll the dough again through the most recent setting and then narrow it by 1 notch each time you pass the dough through the roller, until it reaches the desired thickness or final setting.
Cut the rolled dough into thirds, dredge each piece in the flour on the jellyroll pan until completely coated, and loosely fold accordion style. Cover with a damp tea towel to prevent drying.
Remove another quarter of dough, rewrapping the remaining dough, and repeat the rolling and laminating process, cutting, flouring, and loosely folding each pasta sheet at the end. Do the same with the remaining dough quarters, dusting the cut dough and jellyroll pan with more flour as needed to keep the loosely folded dough from sticking together.
Spread out one dough sheet, pulling the damp tea towel back over the remaining dough, and feed it through the pasta cutter. Dust the noodles liberally with flour, and curl them into a nest. Place them back on the flour-dusted jellyroll pan and continue cutting the remaining sheets, covering the pasta nests with the damp tea towel until ready to cook.
Bring a large, wide pot of salted water to a rolling boil. Add the pasta nests, stirring gently with a wooden spoon to keep them from clumping. Cook for about 1-1/2 to 2 minutes, until just set, tasting to check. Drain, toss with Garden-Fresh Basil Pesto, and serve, garnishing with additional pine nuts and home-smoked Parmesan cheese if desired.
Tips & Tricks
- Even with my hand-cranked pasta maker clamped securely to the counter, it’s easiest to run the machine with two people: one operating the crank and adjusting the roller and cutter width and one feeding the pasta through the machine and catching it on the other side.
- If the pasta sticks together at any point after you start rolling, you can laminate it again and reroll it.
- My pasta maker has two noodle cutting widths, for spaghetti and fettucine. To accompany Garden-Fresh Basil Pesto pounded with a mortar and pestle, I like the wider noodles, rolled down to the pasta maker’s final setting. I also roll the noodles as thin as possible if I’m going to use the full sheets for ravioli but leave them a bit thicker for lasagna.
- Fresh pasta cooks incredibly quickly; if you cook a full batch at once, the water may not even return to a boil before the noodles are done. Break off a small piece frequently and taste it to ensure you don’t overcook the pasta.
- The pasta ball can be frozen in a zip-close freezer bag for up to 3 weeks, thawed in the refrigerator, and then rolled and cut. The fresh dough can also be stored in the refrigerator for a couple of days but may take on a grayish tinge. The pasta nests can be frozen directly on the jellyroll pan, moved to a zip-close freezer bag, and frozen for up to 3 weeks before cooking. Cook the pasta nests directly from the freezer.
Want more Twice as Tasty recipes? Get my books! Click here to order a personally signed, packaged, and shipped copy of The Complete Guide to Pickling directly from me. I also share tasty ways to use pickles in The Pickled Picnic, a digital collection in an easy-to-read PDF format; it’s only available here.
Discover more from Twice as Tasty
Subscribe to get the latest posts sent to your email.

Pingback: Toaster vs. Toaster Oven – Twice as Tasty
Who could ask for anything more?
LikeLiked by 1 person
Everyone should make pasta and their own pesto! I’m still waiting for a sufficient crop of leaves, here, this year – but pesto is summer staple made in just a minute or two. It’s well-worth seeking out a light fruity oil (preferably from Liguria) and avoiding the strong, peppery oils of Tuscany (the ones that can make you cough – in a good way).
Anyone with a hand-cranked pasta machine shouldn’t overlook the simplest way of using the sheets: to cut them into suitable lengths to bake as lasagne, or to roll around a filling to make cannelloni. Fresh pasta is so versatile, and quick.
LikeLike
Thanks for the tips, Clive. We have a couple of great local shops that stock a range of olive oils, so I’ll have to grab some from Liguria when I pop in next.
LikeLike