
Canning, jarring, putting up—depending on where you live, one of these terms likely comes to mind when you hear someone talk about preserving food. Once the domain of grandmothers with giant gardens and 4-Hers learning home-ec skills, recent years have seen a shift in the people processing at home. Eugenia Bone released Well-Preserved in 2009, sharing recipes developed in her New York apartment and designed to fill two to six jars at a time. Blogger Marisa McClellan launched Food in Jars, and her success and subsequent books helped popularize small-batch canning. Articles on home canning appeared in the Wall Street Journal and New York Times and on NPR, and Slate declared at-home preserving “ridiculously trendy.” Since then, the number of books, blogs, and people canning at home have only grown.
I love that a rising interest in eating well year-round has led more people to support farmer’s markets and CSAs, make meals from scratch, and save what’s in season for later use. The appeal of small-batch processing is understandable: Take your leftover fruit or veg and seal it in a couple of jars. The argument is that it’s a quick and easy way to preserve food.
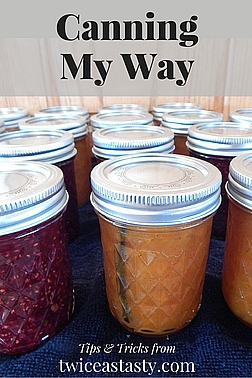
The “couple of jars” part is where I disagree. By the time I prep my canning gear and the food item, heat a kettle of water, make a brine or jam, and finally process the batch, I want to pull the maximum number of jars from that kettle. Instead of going small, I recommend going big—at least big enough to maximize your yield while minimizing your effort and sometimes spreading out the work.

Because face it: Canning is work. Of all the methods for preserving food described on this blog, it requires the most specialized equipment and takes the most time. But the results are worth it. Canned food is shelf stable, lasts a long time, is easy to gift and share, and often can simply be opened and eaten.
When it comes to canning, I’m all about maximum flavor, and I want any additional effort I put into a jar of salsa or jam to be spent on its taste, not on setting up my equipment and cleaning up after two jars are at the stoveside. As you saw with my recipes for pickled snap beans and rhubarb marmalade, the proportions are designed for full batches. You’ll see a similar yield in the recipes I share this month. I’ve found that like a dishwasher, I and my canning kettle are most efficient when that kettle is full.
In short, I advocate full-batch canning—and even multiple batches when you find yourself in possession of a pasta sauce or salsa recipe so popular your family devours a jar a week. Instead of going small, put some thought into the adventure and make your canning session full and fun. Here’s how:
- Plan ahead. Almost everything you will can has a season specific to your area. Even if you aren’t growing the food, buy locally and in season for the best results. Get a grow calendar for your area (your region’s cooperative extension website can be a good source) and note on your calendar when the produce you want to process will likely be ready for harvest.
- Start small (but not necessarily small batch). If you’re new to canning, don’t try to run your entire garden through a water bath. Instead, process just a couple of things during your first season. One type of jam and one pickle, or pasta sauce and applesauce—choose foods that those in your house eat most often, and you won’t have any problem getting through a full canner batch of seven jars by the following season.
- Grow or buy what you will eat. It’s tempting to look at a 20-pound box of freshly harvested zucchini and say, “Well, let’s pickle it.” But are you really going to eat that many zuke pickles? If not, save some using a less time-intensive technique or give some of the fresh harvest away—and plant fewer zucchini next year.
- Keep a canning journal. A journal doesn’t have to be fancy: my first “canning journal” was a sheet of paper inside my Ball preserving book. At minimum, list the date you processed, the raw weight of the main produce, and how many jars you filled; I also like to list the recipe used so that I can find it next year. Next spring, pull out your list and check it against what’s left on your shelves. Suddenly, steps 1–3 listed here will be easier.
- Stay organized. After checking my canning journal and deciding what to process over the season, I start stockpiling the nonproduce items I’ll need: lemon juice, vinegar, sugar, honey, etc. I also check my cache of jars and lids, making them accessible after a winter in storage. The process goes far smoother if I don’t start heating a water bath and then realize I need to run to the store.
- Break up the work. Canning is done in steps, but many steps can become stages spread out over a few sessions. Sure, you could spend all day pickling beets. You could also harvest one day, roast and peel the next, brine the third, and process the batch on day 4. Fruit for preserves and tomatoes for sauces and salsas can be harvested, frozen, and then canned at your convenience. Many recipes on this blog call for foods that are grilled or macerated, techniques that add time but ultimately split the work over multiple sessions, saving time on canning day.
- Spend now, save later. Gift-giving is hugely popular yet can be hugely impersonal. This makes your gift box of home-canned goods all the more memorable. I give my parents and sister cases of canned goods at Christmas. Of-age friends often get Grilled Tomato Bloody Mary Mix with pickled snap beans on their birthday. Newlyweds send the nicest notes when I set them up with pickles, jam or raspberry syrup with homemade pancake mix, and other goodies they can simply grab and eat. Sharing a couple of jars from a full canner takes no additional time and costs far less than I would spend in shops.
- Play with others. Canning with others sometimes makes things go faster and always makes things more fun. When filling jars, it’s often easiest to set up a mini assembly line, with one person filling, another screwing on rings and lids, and a third adding the jars to the canning kettle. Canning parties also can be great for jars that require lots of chopping and prepping, like salsa.
Still think small-batch canning is for you? Try this instead: Grab a few friends, each pick a recipe, and then plan a series of canning dates in one another’s kitchens. Eat some snacks, chat and prep, crank out a full batch, and then send everyone home with a couple of jars. At the end of the season, you’ll have had a fabulous time building up a full and varied pantry.
Twice as Tasty
One of my favorite ways to maximize canning time is to make it Twice as Tasty. Sometimes, this means using the trimmings from one recipe as the base for another. Other times, it’s heat the canner once and process twice. That’s what the blog is all about, and that’s the focus of this month’s recipes.
If you loved Rhubarb-Rosemary Syrup and Rhubarb-Orange-Ginger Marmalade, you’re definitely going to be a fan of the syrup and jam I make with raspberries. Cherries are coming into season, and some of my favorite scones can be made with fresh fruit in summer and Tart Cherry Butter with Chai Spices in winter. I’ll also share a variation on a childhood cucumber pickle recipe—and a way to use that brine that doesn’t involve picklebacks. See you next week!
Discover more from Twice as Tasty
Subscribe to get the latest posts sent to your email.

My elderberry jelly MUST win a blue ribbon tomorrow at the Santa Cruz Mountains Harvest Festival! It has won second place for the past three years, but never first place! There is some little old lady in Ben Lomond who is making a quilt out of all her blue ribbons; but she needs some red in it! I wish I had done some pickles too, but like you say, it is a bit of work. I do not have a freezer. Until a few years ago, I had no electricity for a freezer.
LikeLike
I hope it won! The freezer definitely helps in stockpiling for salsas, jams, and other canned goods. But you can still play with some of my other tricks to get the most out of your produce, like grilling and draining juices from tomatoes and tomatillos for salsa and macerating and roasting fruit to release juices.
LikeLiked by 1 person
HOW EMBARRASSING! Not only did it NOT win the blue ribbon, and not only did it NOT win the red ribbon, and not only did it win only the THIRD place white ribbon, but it LOST to my Mother’s peach jam! I wrote about it. My Pa will never let me forget this!
LikeLike
Ha! I just checked it out. Sorry for your loss–but what a great story. 🙂
LikeLiked by 1 person
Well, I will get my blue ribbon next year!
LikeLike
A ton of great information. I agree with you completely on going large. I tend to always make full batches of everything and sometimes even more than one — just for good measure. Keeping track of everything is a challenge though. I have more than 70 different jams, jellies, preserves, syrups, and sauces in the pantry now. That doesn’t even include the vegetables, juices, concentrates, or pie fillings. Look forward to reading more of your blog. ~ Tilly
LikeLike
Thanks, Tilly! I’ve found the canning journal to be key to keeping track of what I put up each year. I also do my best to keep the shelves well organized, with the same type of jam, say, in the same “aisle” running front to back on the shelf. Finally, I return empty jars to storage boxes rather than the back of the shelf so that I can easily see when an aisle is getting low or is heavily stocked. If only it were so easy to keep track of what’s in the chest freezer!
LikeLike
I have the same problem. Although I hate the organization of a chest freezer, I love how much it holds. I have an upright as well, and that is very organized, but it doesn’t hold as much as the chest freezer. I’ve tried keeping a list, but with the kids and Hubby digging in it, the chest freezer is doomed to always be a mess.
LikeLike
The digging is definitely the biggest problem. My house is tiny, so I chose chest freezer over upright for the same capacity reasons. I try to limit digging by keeping 1 bag of each of the most frequently used things in the fridge-top freezer and restocking it myself. I also have some large plastic baskets that fit into the chest freezer and at least keep fruits, soup veggies, and such in general locations. But somehow I still find lost treasure whenever I update my inventory.
LikeLiked by 1 person
I’m right there with you.
LikeLike