

How’s your garden growing? If it’s anything like mine, you’ve moved beyond planting to weeding and harvesting—and harvesting, and harvesting. With so much food coming ripe so quickly, it’s time to dig out the canning kettle, dehydrator, crocks, and other preservation tools that will let you enjoy homegrown (or farm fresh from a CSA) produce the rest of the year.
Later this month, I’ll be teaching a free online workshop through Free the Seeds that focuses on preparing to preserve your harvest. It’s a big topic, with far more information than I can share in one session, so I’ll be expanding on that topic all month here at Twice as Tasty. Be sure to join me online July 15 so that I can answer your questions directly (sign up for the Free the Seeds mailing list to receive a registration email), and then check back here for additional tips, tools, and recipes that save your harvest. You’ll also find pages of information on basic tools and techniques here.
Update: My live Prepare to Preserve the Harvest presentation is now available online. Watch it here.
Whatever you grow or buy, whatever you have for storage space, and whatever time you can free up to preserve food, there’s a technique that lets you save your harvest. As you prepare to preserve, think about your options and decide which one fits best—for you and the specific fruit or vegetable you want to save.
Canning
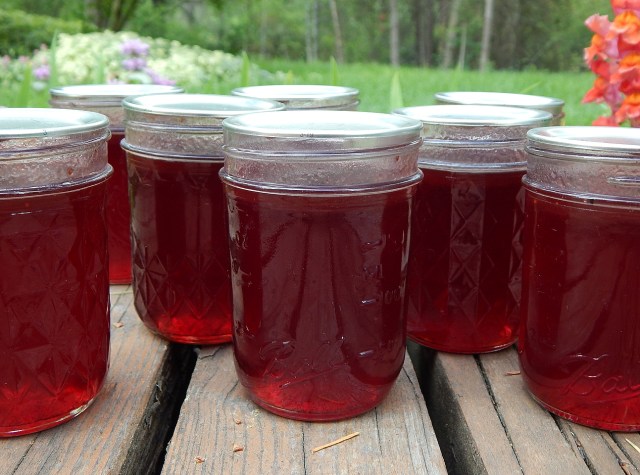
When people think of preserving food, they generally think of canning: sealing food into glass jars using heat. The heat kills food spoilers; the airtight seal prevents new ones from moving in. The result is a beautiful, shelf-stable jar that you can pop open and eat any time of year.
Many people are afraid to can at home, but it’s far easier and safer than you might think. Home canning has standards; start by downloading a free copy of the U.S. Department of Agriculture’s Complete Guide to Home Canning, 2015 revision, for reference. It has equipment that ensures ease and safety in processing. And resources and recipes abound, including on this blog.
Pros: Canning lets you store food long term at room temperature, saving precious fridge and freezer space. Many of the necessary supplies are reusable, reducing your purchase of single-use plastics. And canned food often can be eaten straight from the jar and easily gifted.
Cons: Canning takes more time than many other preservation techniques. It requires some specialized tools that need to be purchased and stored when not in use. And you have to follow the rules: certain steps must be taken to ensure the food remains safe throughout storage.
Favorite Twice as Tasty recipes: Definitely Dilly Beans, Tart Berry Jam, Grilled Tomato Chipotle Salsa
Learn: Read more about preparing to can here.
Dehydrating

Dehydration provides nutritional, flavor, and storage benefits and both preserves and enhances a surprising range of foods. The dehydrating process is ancient. A combination of warm temperatures and circulating air pulls moisture from food. Removing sufficient water from food prevents its natural microorganisms from multiplying and spoiling it. Keeping the food dry keeps it preserved.
For many people, dried food fits one category: herbs and spices. But even these can be upscaled by drying homegrown herbs, saving seeds, and even smoking and drying chilies. I also dehydrate backpacking food, lunchbox snacks for kids and adults, and breakfast granola.
Pros: Dried food packs intense flavor into every bite. Dehydration is a space saver; you don’t have to use precious freezer space, and you don’t need to mess with filling and processing jars. It’s an easy process that requires little hands-on time.
Cons: Food that isn’t fully dried can mold. Even food that is properly dried but isn’t properly stored can reabsorb moisture and spoil. To truly control moisture, heat, and other factors, you’ll want to consider purchasing a dehydrator.
Favorite Twice as Tasty recipes: Italian Seasoning Blend, Roasted Kale Chips,
Smoked Chilies
Learn: Read more about preparing to dehydrate here.
Dry Storage

Dry storage is probably the easiest, and least time-consuming, preservation method. It only works for certain vegetables and fruits, but the list is longer than you might suspect. Beets, carrots, bulb alliums like onions and garlic, potatoes, winter squash, apples, cabbage, and winter root vegetables like celeriac, Daikon radishes, and rutabagas can all be stored whole in a dry place. If you have a root cellar, you have a ready-made place to hold your bounty, but a corner of a cool garage or mudroom, a cupboard under stairs, or even an unused coat closet can be a modern substitute.
Pros: Dry-stored food requires minimal prep and handling. You don’t need special equipment or packaging; I primarily reuse boxes, broken-down ice chests, and buckets. When properly stored, the vegetables and fruit can keep into spring.
Cons: Certain varieties work best for long-term storage, so you may need to wait until next growing season to put the best seeds in the ground. Temperature and humidity affect how well and how long you can keep the produce—and different fruits and vegetables have different needs. Even though you can squirrel away a large amount of produce in a surprising number of places, it will take up space.
Favorite Twice as Tasty recipes: Salt-Preserved Herbs, Roasted Garlic Soup, Thai Squash Curry
Learn: Read more about preparing to dry store here.
Freezing

Most people are used to keeping vegetables, berries, and other small fruits in the freezer, making it a fast, easy, and natural storage method. But as you think about what’s in your garden, you’ll find a huge range of freezable homegrown food. I harvest and freeze herbs, chilies, grated cucumbers and zucchini, garlic cloves, and more without needing to spend hours in the garden or kitchen. I also freeze lots of grilled and smoked produce, vegetable stocks and soup base, and cubes of pestos and purees; they require more prep upfront, but they’re ready to drop into a meal, sometimes even without defrosting first, on the other end.
Pros: Most fruits and vegetables need minimal prep before you stick them in a freezer. Freezing clamps down on bad bacteria and food spoilage. Some delicate produce keeps its fresh flavor when frozen.
Cons: Many people have limited freezer space, and chest freezers are a financial and energy investment. Food expands as it freezes, making space even tighter. And the larger your freezer, the harder it is to keep track of what’s inside it and quickly grab what you need.
Favorite Twice as Tasty recipes: Frozen Cherry Tomatoes, Basil Pesto Base, Vegetable Scrap Stock
Learn: Read more about preparing to freeze here.
Pickling, including Fermenting

Pickling is a safe, easy way to preserve almost any vegetable and even fruit. Clearly, it’s one of my favorite preservation methods, since I’ll be publishing an entire book on pickles this fall. Pickling relies on salt and acidity. These two factors not only prevent spoilage but also give pickles their distinctive kick and texture. For vinegar pickles, acidity is key to the brine. For fermented ones, salt is front and center—not necessarily on your tongue but in the preservation process. In either case, bad microbes are held at bay and the produce stays crisp, tasty, and safely edible for a long time.
Pros: Pickling preserves low-acid food safely. It’s endlessly variable, letting you preserve single jars or bumper crops. And flavor variations make pickles fit any meal.
Cons: Pickling alters the fresh flavor of the produce, making it tangy or sour. The technique usually requires an additional storage method (canning or refrigerating) and space. And no matter where you put them, those jars of pickles can be heavy—my refrigerator has reinforced shelves to support the weight.
Favorite Twice as Tasty recipes: Cumin-Spiced Zucchini Refrigerator Pickles, Quick-Pickled Watermelon Rind, Fermented Tea Pickles
Learn: Read more about preparing to pickle here.
Refrigerating

Refrigeration brought about a food preservation revolution when it developed in the 18th century. Today, we think of it primarily as a short-term storage space, but some food stays fresh a surprisingly long time in the refrigerator. How you store it is key: My fresh produce lasts longer in reusable cloth bags, airtight containers extend preservation of prepared food, and food stashed in the back corners of the fridge keeps better than that at the front of shelves or in the doors.
Most of the food I keep for months in the refrigerator has already been preserved another way: pickled, fermented, preserved with sugar or alcohol. So refrigeration is less about technique and more about storage space.
Pros: Fresh or home-processed, cool temperatures preserve the flavor and texture of homegrown food. I would argue that you can preserve the widest range of produce in the fridge. And few tricks are needed to make food last when refrigerated.
Cons: Refrigerators take up space and energy; few people have more than one in their home. That fridge must hold everything from favorite condiments to tonight’s leftovers, making it challenging to give up real estate for long-term storage. And although cold storage can slow the decay of food, the temperature alone won’t halt spoilage.
Favorite Twice as Tasty recipes: Vegan Roasted Raspberry Vinaigrette, Home-Smoked Chili Paste, Mint Simple Syrup
Learn: Read more about preparing to refrigerate here.
Twice as Tasty
 Now’s your chance to learn more about preparing to preserve your harvest directly from me, no matter where you live. Join the Free the Seeds mailing list to get a registration email for my free, real-time, virtual session on July 15. Throughout the month, I’ll expand on the preservation techniques outlined here and share recipes that use them. To keep an eye on what I’m harvesting and preserving from my own garden, follow Twice as Tasty on Instagram. I’d also love to see what you’re harvesting and preserving; just tag Twice as Tasty on Instagram or Facebook.
Update: My live Prepare to Preserve the Harvest presentation is now available online. Watch it here. You can also read the blog series:
- Prepare to Preserve
- Quick Food Preservation (dry storage, freezing, and refrigerating)
- Prepare to Dehydrate
- Prepare to Can
- Prepare to Pickle
Like what you’ve learned here? Learn more by subscribing to the Twice as Tasty newsletter. Click here to sign up.
Discover more from Twice as Tasty
Subscribe to get the latest posts sent to your email.
